The Hilbert Guide
A cookie cutter approach to PVP
The Hilbert Guide
A cookie cutter approach to PVP
A cookie cutter approach to PVP in Star Trek Online by Hilbert@mancom
You can comment on this guide in its thread on the STO forums.
The intention of this guide is to give you the information you need to stop being a liability for your side in a PVP match.
You won't be given information about various concepts and how to make your own decisions.
You will be given exactly one build for your ship class that you just need to implement. A solid build is an important first step, because you cannot succeed without a good build. Then you can begin practising how to fly it.
Since I will give you exactly one build, there are often ways to modify the build without changing the core idea - like choosing a different ship within a class or using different energy types. If you know what you are doing, you can make these adjustments. But if you really knew what you were doing, you probably wouldn't need a cookie cutter guide.
The bridge officer abilities are chosen in way so that they are available from either the bridge officer trainer or from candidates that you can easily buy from the exchange or C-Store. When an ability is not available from the trainer, this is explicitly stated.
For the most part the guide gives gear recommendations which are easily obtained and comparatively cheap. The changes in Season 7 regarding how one acquires STF gear have made some of the items more difficult to get, but the recommendations for engines / deflectors / shields still include this STF gear because it is extremely good.
As a stopgap, I recommend the Paratrinic Shield Array, the Supercooled Combat Impulse Engine and the Polarized Parabolic Deflector.
All the necessary gear is available from the dilithium store (beneath your mini map), PVE mission rewards or as STF gear that you can unlock through the Task Force Omega reputation system.
The following list gives the sources for the items that are not available in the dilithium store.
| Item | Source |
|---|---|
| Assimilated Module ("Borg console") | Omega reputation |
| Assimilated Deflector Array | Omega reputation |
| Assimilated Subtranswarp Engines | Omega reputation |
| Assimilated Regenerative Shield Array | Omega reputation |
| M.A.C.O. Resilient Shield Array | Omega reputation |
| Subspace Field Modulator | Klingon War: Skirmish |
| Paratrinic Shield Array | Klingon War: Past Imperfect |
| Plasma-Disruptor Hybrid Beam Array | Klingon War: Past Imperfect |
| Plasma-Disruptor Hybrid Dual Heavy Cannons | Klingon War: Past Imperfect |
| Supercooled Combat Impulse Engine | Breen Invasion: Cold Case |
| Polarized Parabolic Deflector | Breen Invasion: Cold Call |
There are items that are better than the recommended ones, especially when it comes to weapons. Unfortunately the weapons with the best modifiers are not available from missions or the dilithium store.
Your weapons should have at least one [Acc] modifier, preferably two. [Acc]x3 is even better, but usually too expensive for the improvement over [Acc]x2 that it provides.
There are many ways to acquire weapons, e.g. dilithium store, fleet starbase and exchange. When you choose weapons make sure that you don't use plasma weapons (because the commonly used STF gear shields have a plasma resist; note that the recommended Plasma Disruptor Hybrid weapons deal disruptor damage) and that you use only one energy type on your ship. Make sure that your tactical consoles match the energy type of your weapons.
When it comes to set items, make sure that you use only items of the same level of a set. The set bonus won't work if you mix different levels.
This guide is built around your spacebar. You will have to pilot your ship, keep pressing spacebar all the time and every now and then use heals on yourself and your allies.
As to make this spacebar way of PVPing possible, you have to use keybinds to bind abilities to your spacebar.
Download the file spacebar.txt (right-click, then "Save target as ...") and place it in your STO directory which is usually at
C:\Users\Public\Games\Cryptic Studios\Star Trek Online\Live
Start STO, log in with the character you want to play, go into a space map. (There are different keybind sets for ground and space!) Then enter the following command into your chat box:
/bind_load_file spacebar.txt
This keybind file changes three keys:
You can also use the graphical STO Keybinds tool that Federation Emergency Services provides.
Use the built-in browser window of that tool via the "Web Open" button, go to http://hilbertguide.com and navigate to this keybinding section of the guide.
There will then be an additional button that allows you to import the spacebar keybind into the application.
You can select different views for your tray. It shows two or three out of ten possible rows. You can add an ability to multiple locations of your tray (e.g. in two different rows) by pressing P to bring up the ability list and then dragging it to your tray.
Select tray 7 and add the abilities that are required by the individual ship builds (see the respective sections). Tray 7 does not need to be visible to have the spacebar keybind work. You can therefore select a different row again after you are done wih tray 7 and set up your regular trays like you are used to.
The spacebar is your key to success. Pressing it every couple of seconds keeps your weapons firing, your shields redistributing and your buff cycle going.
Make sure that your weapons are set to autofire. To do that bring your tray into mode 1,2 or 3 where you can see the weapons box. Right click on your weapons until they all have a green outline:

After you have done that, you can switch to a mode that hides your weapons box (if you want that).
You can use the F1 key to select yourself. This can be useful if you want to make sure that a heal that you activate goes to yourself, like clearing yourself with Science Team from AMS/SS/SNB.
Use the keys F2-F5 to target the other players on your team.
Keep in mind that the range for heals is 10km (7.5km for Extend Shields). If you are more than 10km away from your allies, you cannot heal them and they cannot heal you. So stay in range of them.
As with the keybinds, you need to be in space with your character for the following.
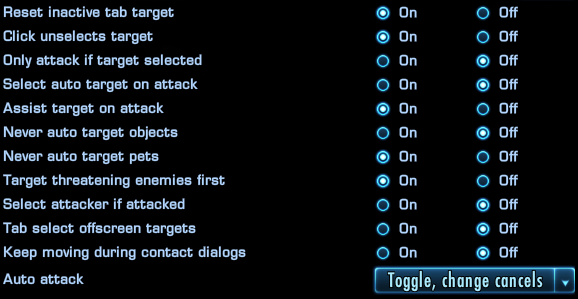
Use the key Escape to bring up the menu window and select Options. Go to Controls. Set it up as shown here:
Then go to HUD and set all the Show ... Name / Life / Reticle options (with the exception of the two options under Yourself at the end) to Always. Example:

 Setting up correct power settings is one of the most important
things in the game. Bring your power settings box into mode 3. Now you can
select a power mode with one of the four symbols at the top (the defaults
are weapons / shields / engine / balanced). After having selected a power
setting, you can adjust the settings with the power sliders. After having
set new power levels, press the floppy disk button to save the preset.
Setting up correct power settings is one of the most important
things in the game. Bring your power settings box into mode 3. Now you can
select a power mode with one of the four symbols at the top (the defaults
are weapons / shields / engine / balanced). After having selected a power
setting, you can adjust the settings with the power sliders. After having
set new power levels, press the floppy disk button to save the preset.
Which power settings you have to use is mentioned in the individual ship class sections.
The Duty Officer system allows you to gain passive bonuses by equipping up to 5 Duty Officers on your Active Roster. I recommend that you get three Shield Distribution Officers (you can not equip more than three of this type of Doff). Go to the Duty Officers tab in the Duty Officer window, select Active Space and assign your Shield Distribution Officers to active space duty.
When you activate Brace for Impact and have these Doffs equipped, you have a chance to trigger a shield heal.
As you receive better Doffs you can gradually improve the rarity level of your Shield Distribution Officers. Do the colonial chain missions in the Rolor Nebula for that - it will eventually give you blue and/or purple Shield Distribution Officers.
Escorts deal damage. They have little healing and usually rely on heals from team mates to survive.
This spec is identical to the cruiser spec and therefore flexible enough to switch between all types of escorts and cruisers. No reason to spend money on respecs when you can just use a "one size fits all" spec.
The spec shown is for a Tactical captain. To adopt it for any other class you only have to change the ground portion of the skills.
| Fore Weapons |  |
| Deflector |  |
| Impulse |  |
| Shields |  |
| Aft Weapons |  |
| Devices |   |
| Engineering Consoles |   |
| Science Consoles |   |
| Tactical Consoles |  |
For alternate gear suggestions if you don't have access to the Borg / MACO gear, see the section Gear.
Ship Stations


See Abbreviations for the full names of the bridge officer abilities.
The ability Attack Pattern Omega 3 is not available from the trainer, but it is available on various cheap bridge officer candidates of levels green and better. It can also be trained by sufficiently skilled tactical captains.
If you have access to a tactical captain who can train CRF3 you can also try this:
The abilities that you need to put into tray 7 (see also general concepts) are:

EPtS 1 / EPtS1 / CRF2 / APO3 / CSV1 / APB1 / APO1 / AtSIF1 / Fleet Support
An example for a filled tray (tray 7 is hidden) in mode 4 is shown here:

As seen in the tray screenshot of the previous section, your (base) power levels should be 100 / 25 / 50 / 25. Overwrite one of the default presets with these values. It is extremely important that you use 100 in weapons.
Make sure that you have read about the general concepts and follow the advice from that section.
Start your buff cycle by manually activating EPtS, APO3 and CRF2. Once you have started this cycle, you just need to keep pressing spacebar every couple of seconds to keep it going. Repeat this start procedure whenever you have dropped out of combat and have no abilities active. But don't worry if this is too difficult to remember at first. Using spacebar to start up the buff cycle can slightly lower the efficiency of the cycle, but not ruin the build.
Point your escort at the target you want to shoot and use spacebar to trigger the shooting. It is important that you keep your target in the (very limited) 45° arc of your front dual heavy cannons. Adjust your flight speed as needed as to not constantly fly "through" your target. But keep in mind that lower speed means lower defense rating and thus you will take more damage if you "park" next to your target. Finding a balance between moving and having a good firing position is vital and can only be achieved by lots of training.
Use your captain abilites at your discretion. The bridge officer abilities that are available for manual triggering are TT1, ST1 and TSS2. Use ST1 to clear SNB, SS, AMS from yourself and other players. Use TT1 to redistribute your shields faster when needed and to clear stacked FOMM on yourself or others. Use TSS2 for shield healing on yourself and others when needed.
The important thing is to keep your target in arc to deal damage. Only your front cannons deal massive damage. The 360° turrets are only support and not sufficient as your only means of dealing damage.
Flying an escort requires good piloting skills, the rest is spacebar and the occasional heal.
Cruisers are versatile ships. They can provide healing and they can deal damage. In contrast to an escort a cruiser's damage is constant pressure damage and not spike damage. The following cruiser build is designed to provide your team with heals and damage at the same time.
This spec is identical to the escort spec and therefore flexible enough to switch between all types of escorts and cruisers. No reason to spend money on respecs when you can just use a "one size fits all" spec.
The spec shown is for a Tactical captain. To adopt it for any other class you only have to change the ground portion of the skills.
| Fore Weapons |  |
| Deflector | |
| Impulse | |
| Shields | |
| Aft Weapons | |
| Devices |   |
| Engineering Consoles | |
| Science Consoles |  |
| Tactical Consoles | |
For alternate gear suggestions if you don't have access to the Borg / MACO gear, see the section Gear.
Ship Stations


See Abbreviations for the full names of the bridge officer abilities.
The ability Auxiliary Power to the Structural Integrity Field 3 is not available from the bridge officer trainer. You can get it on some bridge officer candidates on the exchange or you can buy it from the C-Store in the form of a Federation Aenar Bridge Officer Requisition that you can then use to buy an Aenar Engineering Officer Candidate that has this ability.
One thing is important when you set up your bridge officers: Skill EPtW2 only to level 6 so that it has a 60 seconds cooldown! This way it fits perfectly between the two copies of EPtS1.
The abilities that you need to put into tray 7 (see also general concepts) are:

EPtS1 / EPtS1 / EPtW2 / FAW2 / Fleet Support
An example for a filled tray (tray 7 is hidden) in mode 4 is shown here:

Your (base) power levels should be 100 / 25 / 50 / 25 if your primary intention is to deal damage and 100 / 25 / 25 / 50 if you want stronger heals. Overwrite two of the default presets with these values. It is extremely important that you use 100 in weapons.
Make sure that you have read about the general concepts and follow the advice from that section.
For a cruiser that does a lot of target switching to heal allies, it is a good idea to set the option Auto attack (in Options -> Controls) to "Toggle, non-combat cancels".
![]()
Use your spacebar to keep your buff cycle going, fire weapons and redistribute your shields.
Use your captain abilites at your discretion. You have a lot of bridge officer abilities that are not triggered by spacebar. Use ST1 to clear SNB, SS, AMS from yourself and other players. Use TT1 to redistribute your shields faster when needed and to clear stacked FOMM on yourself or others. Use TSS2 for shield healing on yourself and others when needed. Use AtSIF3, HE1, ET2 for hull healing on yourself and others. Use ES2 on other players to strengthen their shield resists. ES2 cannot be used on yourself, so you should give it to others in need of shield resists whenever possible. Use RSP as a last resort shield refill when you are under heavy fire.
The important thing is to keep healing your team and yourself. Only if your allies are alive they can in return send heals to you and do damage to the enemy team. Attempt to keep your target on your side by circling around it. This way you can fire all your eight beams in a broadside and maximise your damage. If you have your target in front of you or behind you, you can only use four of your eight beams and thus lose 50% of your damage. Try to focus on the same target as the primary damage dealer on your team (quickly check the scoreboard during the match to see who is doing the highest damage).
Pay attention to the health bars of your team members to see when they need heals.
Escorts deal damage. Since damage is the only thing that is of any importance in PVE encounters they are the optimal PVE ship (regular missions, STFs, Red Alerts, ...) for any captain type. No matter whether you are Tactical, Engineer or Science, an escort is the most effective way to get through PVE fast.
Attention: This escort build is not suited for PVP matches. It is specifically designed to deal with NPCs.
This spec is identical to the regular escort spec and therefore flexible enough to switch between all types of escorts and cruisers. No reason to spend money on respecs when you can just use a "one size fits all" spec.
The spec shown is for a Tactical captain. To adopt it for any other class you only have to change the ground portion of the skills.
| Fore Weapons |  |
| Deflector | |
| Impulse | |
| Shields |  |
| Aft Weapons | |
| Devices | |
| Engineering Consoles | |
| Science Consoles | |
| Tactical Consoles | |
For alternate gear suggestions if you don't have access to the Borg / MACO gear, see the section Gear.
Ship Stations

See Abbreviations for the full names of the bridge officer abilities.
The ability Cannon Scatter Volley 3 is not available from the trainer, but it is available on various relatively cheap bridge officer candidates of purple level.
If you have access to a tactical captain who can train APB3 you can also try this:
The abilities that you need to put into tray 7 (see also general concepts) are:

EPtS2 / EPtS1 / APB2 / CSV3 / APB1 / CSV2 / TS2 / TS1 / Fleet Support
An example for a filled tray (tray 7 is hidden) in mode 4 is shown here:

As seen in the tray screenshot of the previous section, your (base) power levels should be 100 / 50 / 25 / 25. This is the default attack preset. It is extremely important that you use 100 in weapons.
Make sure that you have read about the general concepts and follow the advice from that section.
This build is super easy to fly. You only need to press spacebar every couple of seconds to keep your buff cycle going.
Point your escort at the target you want to shoot and use spacebar to trigger the shooting. It is important that you keep your target in the (very limited) 45° arc of your front dual heavy cannons. Adjust your flight speed as needed as to not constantly fly "through" your target. Often you can even just "park" and shoot a target. (Note: This is different from PVP where you need to keep moving.)
Use your captain abilites at your discretion. The bridge officer abilities that are available for manual triggering are TT1, ST1, HE1 and TSS2. Use TT1 to redistribute your shields faster when needed and to clear Borg boarding parties on yourself or others. Use ST1 and TSS2 for shield healing on yourself and others when needed. Use HE1 for hull healing on yourself and others and to clear plasma fire procs.
The important thing is to keep your target in arc to deal damage. Only your front cannons deal massive damage. The 360° turrets are only support and not sufficient as your only means of dealing damage.
| APA | Attack Pattern Alpha (Tac Captains only) |
| APB | Attack Pattern Beta |
| APO | Attack Pattern Omega |
| CRF | Cannon Rapid Fire |
| CSV | Cannon Scatter Volley |
| FOMM | Fire On My Mark (Tac Captains only) |
| GDF | Go Down Fighting (Tac Captains only) |
| TS | Torpedo Spread |
| TT | Tactical Team |
| AtSIF | Auxiliary Power to the Structural Integrity Field |
| EPtS | Emergency Power to Shields |
| EPtW | Emergency Power to Weapons |
| ES | Extend Shields |
| ET | Engineering Team |
| RSF | Rotate Shield Frequency (Eng Captains only) |
| RSP | Reverse Shield Polarity |
| MW | Miracle Worker (Eng Captains only) |
| AMS | Anti-Matter Spread (Pay-to-Win console that is universally despised ) |
| HE | Hazard Emitters |
| SNB | SubNucleonic Beam (Sci Captains only) |
| ST | Science Team |
| SS | Scramble Sensors |
| TSS | Transfer Shield Strength |
Since bridge officer abilities are chosen with availability in mind, there are sometimes slightly better setups that require captain-trained abilities or abilities that are only available from certain bridge officer candidates.